
Night Photography
The city transforms after dark—learn to capture what your eyes can't see.
About This Quest
Learn night photography fundamentals through hands-on shooting. Master manual settings, long exposure techniques, and light painting in urban and natural environments.
Night photography strips away the distractions of daylight and reveals the skeleton of light itself. Street lamps carve shadows across empty plazas, car headlights streak into red and white ribbons, and the ambient glow of buildings creates gradients you'd never notice during the day. Your camera sees differently than your eyes at night—sensors gather photons over seconds or minutes, compiling light into images that feel both hyperreal and dreamlike. This quest teaches you manual control in environments where auto modes fail. You'll work with the exposure triangle under pressure: ISO pushed to 1600-3200 to grab enough light, apertures wide open at f/1.8 or f/2.8 to let in maximum photons, and shutter speeds slowed to 1-30 seconds to paint with motion. You'll learn to read histograms in darkness, to stabilize shots without a tripod when necessary, and to use available light sources—neon signs, car trails, moonlight—as your palette. The best night photography happens in the blue hour (20-40 minutes after sunset) when the sky still holds color but artificial lights gain dominance, or during full moons when landscapes glow with reflected light. You'll shoot cityscapes where vertical lines challenge your composition, experiment with light painting using headlamps or phone screens, and capture long exposures of moving water or clouds that blur into silk. Every frame requires patience—the shutter stays open long enough to second-guess your settings—but the results reveal a version of the world most people never see.
Why This Quest Matters
Night photography reveals a parallel city that exists when your eyes stop working properly—where sensors compile seconds of photons into images that feel both hyperreal and dreamlike. You'll walk away with images that most people never see: light trails stretched like ribbons, reflections that double reality, and motion blurred into silk. The patience required—watching your shutter stay open long enough to second-guess everything—trains you to see light itself as material.
What You'll Experience
- Manual control of the exposure triangle under pressure
- How to read histograms in darkness and stabilize shots without auto modes
- Using available light sources—neon, car trails, moonlight—as your compositional palette
- Light painting techniques and intentional motion blur capture
- When and how to shoot during blue hour for maximum color-to-artificial-light balance
What You'll Need
Top gear to make this quest great.
Pull it off
Compact Tripod or Tabletop Tripod
Essential for stability during long exposures (1-30 seconds). Without it, any shutter speed slower than 1/60s will result in blurry images from hand shake. Allows you to frame compositions precisely and shoot multiple bracketed exposures from the same position.
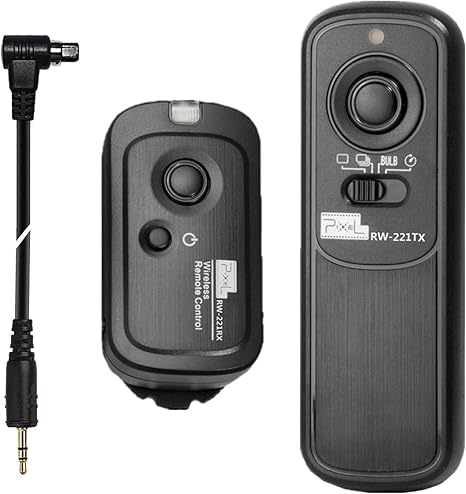
Eliminates vibration from pressing the shutter button, critical for exposures over 2 seconds. Allows you to lock the shutter open for bulb mode exposures longer than 30 seconds. Intervalometers enable time-lapse sequences of moving clouds or traffic.
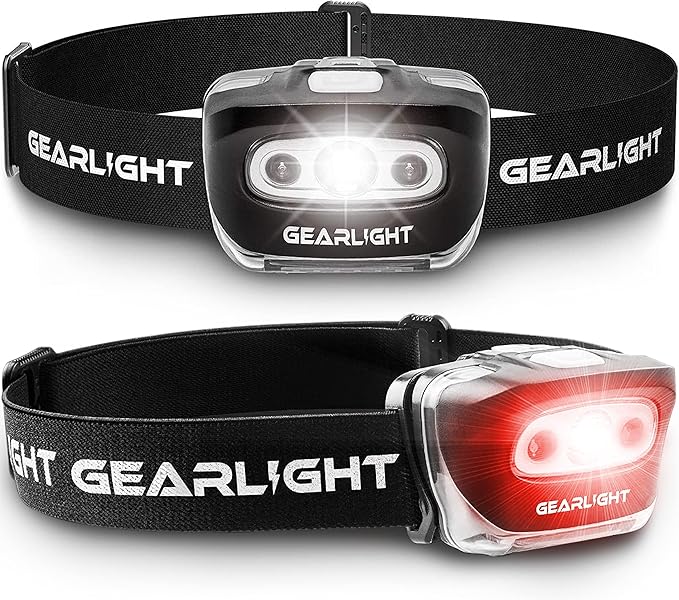
Red light preserves your night vision while allowing you to adjust camera settings, check gear, and navigate safely. White light mode serves as a light painting tool during long exposures. Hands-free operation lets you work camera controls without juggling a flashlight.
As an Amazon Associate I earn from qualifying purchases. Prices may change.
Step-by-Step Guide
Scout during daylight, arrive at blue hour
Visit your location in daylight to identify architectural elements, light sources, reflective surfaces, and foreground subjects. Return 30 minutes before blue hour when the sky holds color but artificial lights dominate. Choose well-lit public areas and keep gear secure.
💡 Pro Tips:
- • Note where shadows fall and where ambient light creates contrast—this mapping informs your night composition
- • Blue hour lasts only 20-40 minutes after sunset; be set up early
Set manual controls and test exposure
Switch to Manual mode. Start with ISO 1600, aperture f/2.8 (or widest available), and shutter speed 1/60s. Take a test shot and check the histogram—aim for the graph centered or slightly right-biased with no clipping at either end. Mount on a tripod, disable image stabilization, and use a 2-second timer to eliminate shake.
💡 Pro Tips:
- • Auto modes fail at night—manual control is non-negotiable
- • Review histograms, not the LCD screen, which looks deceptively bright in darkness
Adjust exposure for your scene
If too dark, widen aperture first, then increase ISO (watching for noise above 3200), then slow shutter speed. For car light trails, use 10-30 second exposures. For stars, keep under 30 seconds to prevent blur. Shoot RAW for 2-3 stops of recovery latitude. Try Tungsten white balance to cool yellow street lights or Daylight to warm blue tones.
💡 Pro Tips:
- • Bracket your shots with +/- 1 stop exposure compensation
- • Check for blown highlights (solid white) and crushed blacks (solid black)
Capture motion and light painting
For pedestrian ghosts, use 1-4 second exposures. For stretched car trails, use 10-30 seconds. Include a sharp static element to anchor the motion. To light paint, set shutter to 10-20 seconds at f/8-f/11, then use a flashlight or phone screen to paint light onto foreground objects or draw patterns during the exposure.
Work with reflections deliberately
Shoot puddles, glass buildings, and car hoods to double your light sources and create symmetry. Position yourself low to emphasize reflection over reality—a puddle can turn a street lamp into a second sun. Frame with intentional negative space where darkness becomes part of the composition.
Finish with an establishing shot
Capture a wide frame showing your location's context—include the horizon or skyline for spatial reference. This becomes your hero image, the one that summarizes the scene's mood and serves as your portfolio's anchor for this session.
Gear Up for Your Quest
The gear that makes this quest work.
Pull it off

Compact Tripod or Tabletop Tripod
Essential for stability during long exposures (1-30 seconds). Without it, any shutter speed slower than 1/60s will result in blurry images from hand shake. Allows you to frame compositions precisely and shoot multiple bracketed exposures from the same position.
+ complete the kit — 3 more

Remote Shutter Release or Intervalometer
RecommendedEliminates vibration from pressing the shutter button, critical for exposures over 2 seconds. Allows you to lock the shutter open for bulb mode exposures longer than 30 seconds. Intervalometers enable time-lapse sequences of moving clouds or traffic.
Wired or wireless trigger that fires the shutter without touching the camera, some models include interval timer for sequential shots
Get on Amazon · $30.79 — Remote Shutter Release or Intervalometerdetails & deals →
LED Headlamp with Red Light Mode
RecommendedRed light preserves your night vision while allowing you to adjust camera settings, check gear, and navigate safely. White light mode serves as a light painting tool during long exposures. Hands-free operation lets you work camera controls without juggling a flashlight.
Rechargeable headlamp with adjustable brightness and red LED option, 200+ lumen output
Get on Amazon · $12.99 — LED Headlamp with Red Light Modedetails & deals →
Nighttime moisture and dust become visible as halos and streaks in long exposures, especially around bright light sources. A quick lens clean between shots prevents ruined images from condensation or fingerprints that scatter light.
Microfiber cloth and air blower for removing dust, moisture, and smudges from lens glass without scratching
Get on Amazon · $18.98 — Lens Cleaning Cloth and Rocket Blowerdetails & deals →RELATED GEAR GUIDE
Fermentation & Canning Kit: 8 Beginner Picks
Field-tested picks · Creative Arts
As an Amazon Associate, IRL Sidequests earns from qualifying purchases at no extra cost to you.
Prices and availability are subject to change. The price shown at checkout on Amazon at the time of purchase will apply.
Editor's Picks
Hand-selected quests our team thinks you'll love

Dawn Patrol: Your First Bird Watching Adventure
Wake up with the birds and see your neighborhood through new eyes.

Creative Skills Quest Hub: Learn By Doing
The best way to learn creative skills? Make bad art until it gets good.

Hand-Built Ceramic Bowl Workshop
Your hands built the first bowls 20,000 years ago. They still can.